Pages

Showing posts with label Halloween Nails. Show all posts

Wednesday, October 8, 2014

Halloween Hellow Kitty nails


Hey there! Here is a manicure I did using L.A. Girl Electric Coral and some decals. The accent glitter is from Claire's. It's a shredded black matte glitter. I used 3 thin coats of Electric Coral and then after that was dry I added the decals and glitter. I needed about 3 coats of top coat to smoother everything out. I love the results. 


Sorry about my absence. I have been doing my nails, not everyday like usual. But, I still do them 1-4 times a week. I will try and post those swatches. Because of my busy schedule lately, I have been experiencing a lot of nail breaks. My nails have been nubs since summer started. Blah! Oh well. 
I am contemplating getting gels in a stiletto style. I know my nails will never grow that long to achieve that look otherwise.

Anyways, thanks for stopping by! 

Tuesday, October 29, 2013

Halloween Nails over Nabi Bronze Holo

Halloween Nails!
Base is 2 coats of Nabi Bronze Holo.
Then I added stickers I bought from eBay.
Then I added Dollish Polish Whats This? Whats This? 
 I painted the glitter polish on a make up sponge to better place the glitter
as well as soak up some of the clear polish.
I like the results.
I had to add 3 coats of top coat to smooth out the stickers. 
They tend to stick up through 2 coats of top coat.

Please excuse my cuticles!
I have had very little time lately for nail art 
or nail care.


And below is the fabulous
Nabi Bronze Holographic polish
in 2 coats with 1 coat of top coat.
I wore this a couple of days
 before adding the stickers and glitter above.


Really surprised by how pretty this
 scattered holographic polish was.
Thanks for stopping by!


Wednesday, October 31, 2012

Halloween Spiderweb Nails / LOTD

HAPPY HALLOWEEN!
I have a cheat manicure for you today.
I started with red nails.
 But, I wanted to wear these press on nails since it was Halloween.
These are the cutest design I saw. I bought them at Walgreens.
 The silver spiders have tiny holographic glitter accents.
Below are more pictures to show the packaging.
Wear time? Hours, not days. At least with the adhesive
 it come with doesn't last for days.
 Maybe if I used super glue they would last longer.


LOTD
Urban Decay Primer
Milani Green Safari shadow eyez, Urban Decay Deep End and Vanilla blended in.
Urban Decay Deep End on lower lash line.
Black liquid liner and mascara.
Milani 3D Glitzy Fashion Diva lip gloss.
My nails were Ruby Kisses Red Slippers (before the press ons)

Tuesday, October 30, 2012

Halloween Skeletons / LOTD


Hey there! I hope everyone is keeping safe and warm today.
Its a bit chilly here in Atlanta, GA.
Crazy weather for the people on the upper East coast.
I think the worse is over for them.
But, of course they are still in our thoughts.

Anyways, back to the silly things in life, like nail polish and make up.
I have been itching to use some of my
Color Club Take Wing polishes that were released for Summer 2012.
They are all vibrant and sparkly! Glass flecked polishes are always a favorite with me. Here is the orange one of the collection, Sparkle and Soar.
 It is a sheer golden orange polish that takes about 3 coats for opacity. I knew this before I started, so I used 1 coat of Ruby Kisses Spicy Apricot, which is a darker orange polish than Sparkle and Soar.
Spicy Apricot is almost opaque in 1 coat and was a perfect to match with Sparkly and Soar. Then I used 1 coat of Color Club Sparkle and Soar.

I received a stamping plate from my Secret Pumpkin (Stinna from Denmark).
I wanted to try it out and you can see behind the white skeletons the black circle pattern I attempted, lol. After all that was dry I put some cute skeleton stickers on top I bought from Ebay. 2 coats of top coat.
I noticed this morning a couple of  the little guys lost a hand, lol.

And below is 1 coat Color Club Sparkle and Soar over
1 coat Ruby Kisses Spicy Apricot
 with WnW Black Creme tips.
 I used circle stickers as an outline to paint the tips on. 
They aren't perfect, but good enough :)


My LOTD
Urban Decay shadows
Tainted (Light Pink), Junkshow (Hot Pink), Omen (Duochrome Purple) and Vanilla (Cream)
I also used Omen on my lower lash line.
Milani Lip Gloss
Black liquid eyeliner and mascara.

A beauty group I am in deemed this week "Candy Week".
So, this is my spin on a 'Candy Look'.

Monday, October 29, 2012

China Glaze Mummy May I / LOTD


China Glaze Mummy May I
Awakening Collection-Halloween 2010

Pink/purple/fuchsia glitter in a dark purple jelly base.
The pictures are 4 coats!
I really suggest a black or dark purple underwear
 and then 1-2 coats of Mummy May I.
I kept getting bald spots. I also had small tip chips after 1 day :(
Those are my 2 complaints. But, I still love it! I added some dancing cat stickers just for fun.


My LOTD
My eyes are Urban Decay primer.
Maybelline Color Tattoo in Asphalt and Urban Decay in Ace and Vanilla.
Black liquid liner and mascara.
Nude lip.


Wednesday, October 24, 2012

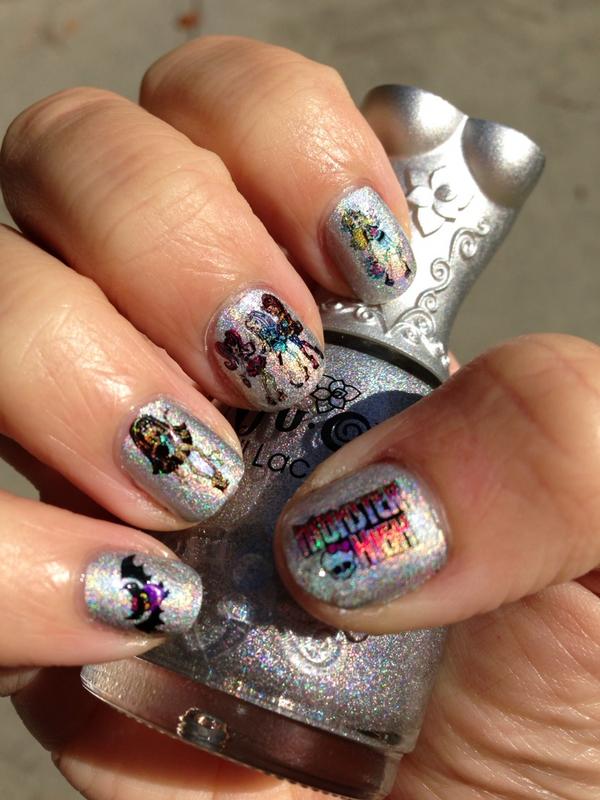
Monster High Nails over Nfu Oh 61/ LOTD


Hey there. I have some nail decals by RLR Creations to show you.
These are custom decals I ordered from her earlier this month.
(Just like any decal, they are put on like temporary tattoos
 after the nail polish has dried.) 
(Above and below pictures are in a light box)


I also tried Nfu Oh 61 for the first time.
First, let me talk about Nfu Oh 61. I received this beauty in a swap. I swapped 3 Color Clubs for this one polish. To me it was a good swap :) I bought the Nfu Oh Aqua Base in a blog sale last month. So, I have finally tried the 2 togethter. I put 1 thick coat of Aqua Base on and let that dry. It didn't seem to take that long to me. I have read other people noting that it took awhile. I put it on and played a quick game on the the computer, so I didn't notice it taking long. After the Aqua Base was dry I put 2 coats of Nfu Oh 61. It went on really easy and looked great!
Below is a picture of it with only the Aqua Base and 61.
I also read that top coat dulls the holographic effect.
Here is a picture below to show what it looked like after clear top coat.

To me, it made the holographic effect more scattered.
 I like a strong holographic linear effect better.
But, it is still pretty.
I used different decals on each hand.
Below is a picture of the Monster High Skull indoors with flash.

Below is the right hand with Monster High character decals indoors with flash.

Below is the right hand with Monster High character decals in sun light.

My 7 year old  daughter is a huge fan of Monster High. I ordered these decals for her, but her little fingernails are too small :( So, I am making use of them, lol. I like the cartoon myself. I haven't sat down and watched an entire movie. But, the bits and pieces seem adorable.

And lastly my LOTD

I didn't wear green today! lol. My husband requested that I didn't, so I wore his favorite color (and mine) BLUE.
I used Milani Shadow Eyez in Aquatic Style and a crease accent of Urban Decay Chaos. I like the look. It is very vibrant, so I wore a neutral lip.
 No foundation or powder.
Thanks for reading :)


Tuesday, October 23, 2012

Pumpkin Glitter over Orly Sweet Peacock


Hey again. I have 2 untrieds for you today.
Orly Sweet Peacock, a blue foil, and Pumpkin glitter in blue and fuchsia.
Orly Sweet Peacock goes on like a dream and does not need a top coat. The pumpkin glitter I bought at Rite Aide for $1.99. The brush was all screwy and I had to trim it. No biggie. The glitters in the Pumpkin polish match Orly Sweet Peacock perfectly. This is why they were paired together. Not very Halloween-y, other than the bottle is a jack-o-lantern, lol. I added matte top coat to see how it looked because it was so shiny it was hard to focus on my nails. I like it matted much better. See the pictures below.

Below is the look Matted.

Below is a picture of the combination without matte top coat.
2 layers of Orly Sweet Peacock, 1 layer of Pumpkin Glitter and 1 coat of fast dry Out the Door.


Below is a close up of Orly Sweet Peacock
 with 1 coat of the Pumpkin Glitter. 1 coat of Out the Door and then 1 coat of Warpaint Beauty Matte top coat.
It is hard to tell in the picture that it is matte.
In person, this manicure looks like it sort of glowing when matted.
 Hard to explain.
I like it a lot better matted.


Below is a close up of this gorgeous polish alone. 2 coats.
Orly Sweet Peacock.
Orly is one of my favorite polish brands.
 Large 18 ml bottles, great polishes, decent price.


Monday, October 22, 2012

Fantasy Makers Once Upon a Time/ LOTD


Hey again. Here is another Fantasy Makers made by Wet n Wild Once Upon a Time. Black jelly base polish with small and medium red glitters. I wore it over 2 coats of black. 2 coats of Once Upon a Time. 1 coat of top coat. We have seen this combination before in Spoiled-Ants in My Pants, Wet n Wild-Behind Closed Doors, and Deborah Lippman- Red Ruby Slippers. I love this polish and am very glad I have it. It retails for $2.99 and is sold where the Halloween Wet n Wild displays are. I have seen them in drugstores and grocery stores. The glitter ratio is great, not too much, but just enough where I don't have to fish for them. See my pictures below :)


And my LOTD.
 No foundation or powder. Just eyes and lips.
My eyes are Milani Shadow Eyez in Green Safari
 and Urban Decay Blitz (gold shimmer).
(I am wearing a green t-shirt with yellow lettering.)
My lips are a Lancome lipstick that I do not know the name to, sorry!

Fantasy Makers Black Magic

Hello! I wanted to share with you a Fantasy Makers polish made by Wet n Wild called Black Magic. It was released last year for the Halloween season and retails for about $2.99. Black Magic is a clear base with short thin bar glitters in aqua blue, yellow, hot pink, orange, green, and red. Usually I don't like bar glitters. But, when they are short like this I don't mind. When I was deciding what to put as underwear for this polish I tried 5 different colors, purple, green, white, blue and black. Black looked the best and matched the name of the polish 'Black Magic'. I used 2 coats of Sinful colors Black. After that was dry I put some round stickers on the top parts near my cuticles to give the half moon manicure look and painted 2 coats of Black Magic. When all that was dry it looked like it was missing something, so I added some star stickers to finish the "magic" look. 2 coats of top coat again to seal the stickers down.


And this was my nail mail waiting for me when I got home!
Hit Polish has sooooo many glitter polishes. She ships very quickly and the items are packaged safely and pretty. I was very happy with my purchase. I even had a custom polish made named "Leilani" after my daughter :)
I highly recommend this indie polish maker.
I hope to show you some swatches soon.